
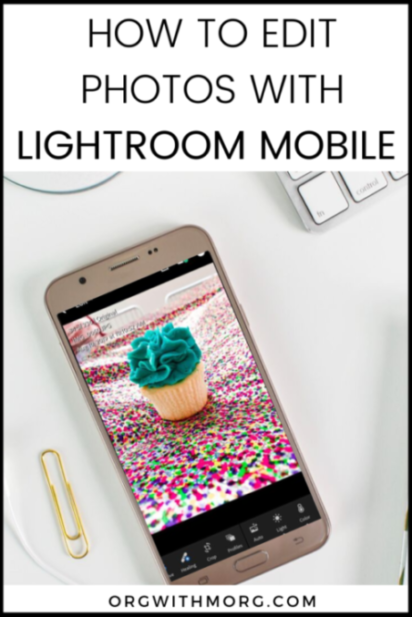
how to edit instagram photos using lightroom mobile
Have you ever taken the perfect Instagram photo, only to realize that the colors aren’t quite as vibrant in the photo versus real life? Maybe the photo’s a little too dark? Little too bright?
Friend I know the feeling. After trying out a variety of photo editing apps, I’ve finally found an app that I know I’m going to stick with for a looooong time.
Lightroom for mobile has made it incredibly easy to edit my photos, create a cohesive Instagram feed, and make my pictures come to life with the tap of a few buttons.
Better yet? It’s totally free!
DON’T FORGET TO PIN IT!
What is Adobe Photoshop Lightroom?
Adobe Photoshop Lightroom for mobile (commonly referred to as Lightroom mobile or Adobe Lightroom) is an app created by Adobe that enables users to capture, edit, and share photos for free.
While the app is free, users are able to upgrade and unlock premium features for a fee. This upgrade allows access to the “selective” tools that aren’t available with the free version, as well as the ability to sync photos on all devices, including desktop.
Just so ya know, I don’t think the premium version is necessary- I’ve never had an issue with the settings/functionalities/capabilities of the free version and have been using it for months!
What can I do with lightroom?
Lightroom has many capabilities, with one of my favorites being the presets function.
You can purchase presets online (some sites even offer them for free), or create your own. Once you edit a photo, you can create a preset.
The next time you need to edit, all you’ll need to do is apply the preset, maybe make a few minor tweaks, and you’re good to go. It’s so easy and such a timesaver!
My other favorite feature is the “color mixer” tool which gives you the ability to adjust the colors of a photo. I love having the ability to showcase certain colors in an image and make sure it really pops!
Ready to get editing? Let’s go!
Step 1: Download the App
Once it’s downloaded, sign in with your Adobe Account if you have one. If you don’t, sign in with Facebook or Google or create an Adobe account. Once you’re finished, you should come to the main navigation screen.
Step 2: Choose Your Photo
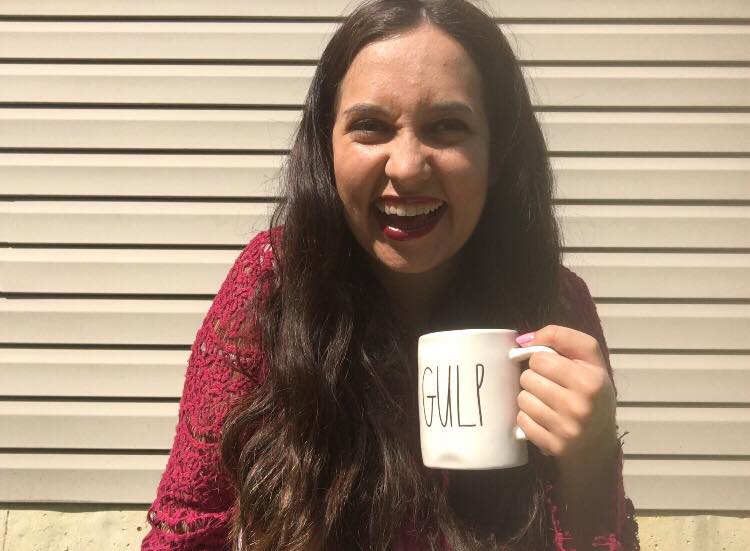
Now, choose a photo you’d like to edit! For the purposes of this tutorial, I’m going to choose this picture that’s my signature “About Me” photo on this website, which I edited using Adobe Photoshop Lightroom. The unedited picture is below:

The picture above is OK, but I’d like to decrease some of the shadows, increase the brightness, and tweak some of the colors. Lightroom gives me the ability to do that quickly- and easily- so let’s get to it!
Step 3: Adjust Light Settings
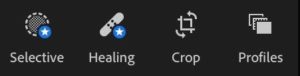
Let’s look at the editing tools.
The tools with blue stars (healing and selective adjustments) are part of Adobe’s premium Lightroom features, so we won’t be touching those. I wouldn’t worry about the “profiles” tool, but if you need to crop or rotate your photo, go ahead using the “crop” tool!
Lightroom has an “auto” feature that automatically edits your photo to adjust for lighting, coloring, etc. I like to be more hands-on when editing my photos so don’t use this feature, but if you want a quick edit, this may be the option for you. Go ahead and try it!
If you try the feature but don’t really like the edit, just click the little arrow facing to the left at the top of the app. This can be used to undo any edit/feature, and the right one can be used to “redo” something. It should look like this:

And, if you want to see how the photo looks with and without the edit, just hold down on the photo to show the before and let go to see the after. I do that a lot to see whether I like the edit I just made.
*drum roll please*
The moment you’ve been waiting for: EDITING YOUR PHOTO! Here we go, folks.
If you’re using a phone, you’ll probably see all of your editing options on a navigation screen at the bottom. If you’re using an iPad/tablet, your editing options should be on the right-hand side, under a “slider” tool icon.
Whether you automatically see it below or are viewing it in the slider tool, you’ll see options for light, color, effects, details and optics. Let’s start with light.
Here, you can change the lighting of the photo- surprise!
I tend to increase the exposure, which is the amount of light in your photo.
I usually increase contrast, too, which is the difference in tones of an image. This means that when you increase the contrast, you’ll increase the differentiation of black and white tones in your photo, which can increase the variety of textures and colors in your image.
Highlights and shadows are other ways of changing the lighting and recovering details in your photo, and whites and blacks “set” the darkest and brightest point of your image.
If you’d like to know about highlights vs whites and shadows vs blacks, this article here is a great resource. I tend to just tweak the settings until I find something I’m happy with!
For this photo, I increased everything besides blacks, which I decreased. Here’s the result so far from changing the light settings:

Step 4: Adjust Color
Once you’ve adjusted your “light” settings, let’s move on to color!
These are my favorite edits to make with within the app. From here, you can set the temperature of your photo to give it a warm or cool vibe, and change the vibrancy and/or saturation of your photo. While I do usually adjust these, my favorite is the color mix tool which can be found in the upper right hand corner.
Here, you can edit the hue, saturation, and luminance of each individual color in your photo.
So, if your photos has a strong yellow tint, you can take out the yellow all together, or lessen its strength to make the true colors pop.
I tend to change the yellow and orange (for skin tone) the most! I will edit the other colors occasionally, especially if a color isn’t showing up accurately or I want to change how it appears to match the same color in other Instagram photos.
For this photo, I increased all of the main color settings a tad, and changed the red and orange hues.
After changing the colors, here’s the result:

Step 5: Other Edits
The last editing tools are effects, details, and optics. I don’t use the optics setting, but do use details and effects.
Details gives you the option to change the clarity, texture, and grain of your photo, as well as the option to dehaze or add a vignette. I usually increase the clarity a tad, and use the sharpening tool on details.
While I usually don’t mess with this, the dehaze tool made a world of difference in editing this photo! Dehaze (as you might have guessed) increases or decreases the amount of haze, fog, and mist in your photo. I’m not sure why the right portion of my photo was a little hazy, but adjusting this setting made a drastic difference!
Other than increasing the dehaze setting (I ramped that baby all the way up to 50!) and the sharpness of the image a bit, I left the other settings alone.
With the final edits added, here’s the before and after of the photo:

The after photo looks brighter, more colorful (I love how the pink pops in this photo!), and overall happier!
I saved this as a preset so when I take photos like this again, I’ll be able to edit that much faster.
Want to learn how to create a preset? It’s super easy, I promise!
6. Create A Preset
Here’s how to save a preset:
Click the three dots in the upper-right-hand corner, and click create preset. From there, name your preset, add it to a group/category (if you want), and then click the check mark.
Next time you import a photo, all you’ll have to do is click on the “presets” setting with the two circles, find the preset you’d like to apply, and voila!
You can still make tweaks/edits after the preset is applied, which is what I do with my photos! I have a handful of presets I use on a regular basis and just tweak the settings for each individual photo.
That's it! YOU'RE A PRO
And if you don’t feel like you’re at pro-status yet, I’m telling you, you will soon! Getting the hang of Photoshop Lightroom is seriously that easy.
Now, you can edit your photos on the go (or from the comfort of your couch), for free, with just a few clicks of a button!
If you decide to try it out, I would love to see your before and afters over on Instagram!
And while I’m planning on sticking with Lightroom like…forever, it never hurts to experiment with something new. I’d love to know what your fave photo editing app is down below!
I am new to blogging and social media. These post are spot on. Thanks!
So happy you found it helpful! Thanks for reading 🙂